
Measuring Instructions
How To Plan For your custom sail
This process is recommended for those measuring eye to eye. Sail sizes are adjusted to for inculded turnbuckles and shackles and also for stretch.
The fixing points (eye-bolts or Pad-eyes) should be installed first (not included). Then measure and the sail is then made to fit
For the a Custom Sail made to fit your space…includes turnbuckles + shackles and is adjusted to fit the space. Shade Sails are made to fit very accurately to their attachment points. Therefore it is important to follow these instructions:
- Plan your installation. Check with your local building Dept. Many installations require a building permit. We are not responsible for obtaining permits or for engineering your installation.
- To Help you visualize the Sails, you can use string stretched between your planned attachment points. Remember the sail do not have straight lines at the edges, they are constructed with a gentle curve that deflects about 10% over the length of each edge. We have found the best looking installations have bold changes in height from one corner to the next, and that overlapping sails or multiple sails give a more interesting look. Also, please ensure you have a 25% slope (1:4 difference from lowest to highest point) to ensure water run off as sails are 90% waterproof and will stretch if water pools on them for too long
- The attachment points should be installed first. Then the sails are made to fit. Therefore, install your posts with eye bolts, plates, eyes or straps to the house, tree or whatever you have chosen to support them. Remember, there can be substantial wind loads. (from 10 to 18 lbs. per square foot of sail). The sails have stainless wire or heavy webbing around their perimeters and can handle high wind loading. These loads are divided between the corners, but it is important that what they attach to be adequate for the loads they can produce. For our posts, we usually start with 4″ schedule 40 steel pipe (galvanized) or temporary power poles (treated) that are 6″ or larger for our posts. They are usually embedded in a concrete footing, 3 ft. to 6 ft. deep and 1 ft. to 1.5 ft. in diameter. As the sails get larger or higher then the post size should be larger. We can provide engineering services (for a fee) to determine these details. Corners of buildings are excellent attachment points and we have designed a special corner clip for that application (see hardware page). Also, it is often possible to connect to remote structures with wire spanning the distance but this should only be used to extend one corner of the sail any significant distance.
- The sails have a stainless steel ring at each corner that must be attached to your fixing point. This can be done in a variety of ways; the best method is to use “D” shackle and turnbuckles. When you have your measurements we will make recommendations as to what attaching/tensioning hardware to use and their locations.
- Measure accurately from the outer edge of the eye of one attachment point to the next. On four sided sails we need diagonal measurements as well. Also supply us with the heights of the fixing points. 6) Choose a color With the made to fit your space option we supply the marine grade stainless steel shackles and turnbuckles to attach the sail to the fixing points or eyes.. Therefore it is essential you use our eyes or fixing hardware so that we can be sure that our turnbuckles etc. fit onto the eyes without extra pieces.
How To Measure for your custom sail
A Custom Shade Sail Adjusted And Made to Fit The Space
To insure proper fit of a custom sail you must follow the directions. Measurements should be to the nearest inch (round down). Please make sure to measure each side individually – do not assume sides will match each other as they are usually a few inches different.
First, you have to install the fixing points (eyes). Estimating their size and location is not enough and will result in a bad fit. This means the posts must be in the ground and their eyes or fixing points installed. Use our hardware. Using other hardware can often create problems with compatibility. The hardware we sell is compatible with each other in size and with similar load ratings. If you use a non-compatible component you may need additional components to bridge the two and this will also cause a misfit, usually adding to the cost.
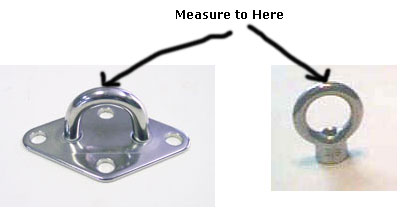
To guarantee proper fit, you need to measure the space the Shade Sail and hardware will occupy. That is to say the space between the fixing points. Therefore, measure from the outside of each eye at its apex that faces the center of the sail. Do not… measure from inside the eye or the face of the post!! If you are doing a 4 or more sided sail then we need diagonal measurements as well. Generally, 2 turnbuckles on triangles and 2 on quadrilaterals are used on custom sails, which are included with the sail. The other corners are connected with a “D” or twist shackle.. We compensate for the size and location of the included turnbuckles and shackles. (Not you) Measure Each Dimension Per the Sketch Below:

Please take measurements per the diagram (do not assume sides or diagonals will match). You’ll be submitting measurements in inches:
Triangles: A-B // B-C // A-C
Quads: A-B // B-D // C-D // A-C
Diagonals for quads (required): A-D // C-B
MEASUREMENTS: (measure from the outside of the eye at the point closest (apex) to the center of the shade sail)
Dos & Donts for measuring
- DO install your fixing eyes first – this means posts in the ground and eye bolts or eye plates installed. Measuring without eyes or surface to surface could result in a bad fit.
- DO use our hardware. Eyes are not included with the sail as every application is different. Our eyes are compatible in both size and similar load compatibility. Attachment hardware can be purchased here
- DO measure from the APEX (outside of each eye)
- DO measure each side individually – We rarely see matching sides, even with the most precise applications.
- DON’T measure from the ground level – your slope will change your measurements. Each side and diagonal should be measured eye to eye PHYSCIALLY.
- DON’T assume the eyes will not make a different in size adjustment. Measuring surface to surface without eyes installed can result in a bad fit
- DON’T assume sides will match. This is rarely true even with our most precise contractors. The only way to be sure is to measure each side and diagonal.
- DON’T try to do the math yourself. Measuring eye to eye allows us to size the sail for the hardware (turnbuckles and shackles) and also for stretch
Generally we use 2 turnbuckles on triangles and 2 on quadrilaterals which are included with the sail when you choose the Adjusted and made to fit option. The other corners are connected with a “D” shackle.. We compensate for the size and location of turnbuckles and shackles. (Not you)
GET A QUOTE ON A CUSTOM SHADE SAIL
Our unique automated quote/ordering system makes it easy to get our best pricing and helps prevent problems like transcription errors. Simply enter your dimensions on this on-line form to get a quote or go all the way to the end to order a custom sail. The automated form also prompts you through the process which speeds up getting a custom sail by days. Prices based on Total Perimeter, Fabric Type and Sail Shape.
custom sails order form